We are going to get to the coding immediately following this paragraph, feel free to skip it. I am NOT the end all be all authority on HTML, I’m not an authority on the subject in any form, but this tutorial is not to teach you everything you need to know. This tutorial is to give you the basics of HTML, HTML5 and maybe some XHTML so you can
1) learn to create a link
2) learn to add an image
3) post a button on your blog
4) determine if it is worth it to you to learn more
This tutorial is dedicated to those who send me emails entitled “I hate to bother you, but………”
The basics of HTML, XHTML & HTML5 are all the same. The 3 are different, but the basic principle is the same. This first page is the boring stuff, but I PROMISE it will be brief. Here we go……
<> this is a tag
You put every bit of your HTML code in a tag <>
Most everything in HTML has an Opening and Closing Tag.
Opening Tag <>
Closing Tag </ >
Self contained open/closed tag < />
You’ll understand more of that later, lets move on.
Open NotePad.
Just do it, don’t argue.
NotePad open? Good.
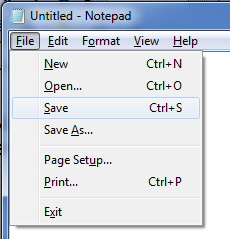
Now in NotePad click File > Save as

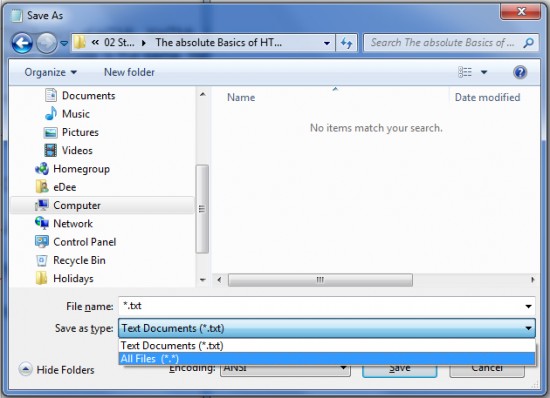
Change ‘Save as type’ to ‘All files *.*’

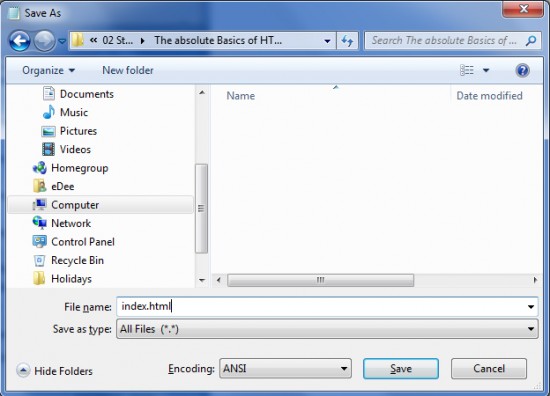
in file name type: index.html
Click Save

Congratulations you’ve created your first html file …………
……..now lets put something in it
First line type: <!DOCTYPE>
That is an HTML5 tag, but since that is the new standard and all browsers now recognize that tag you may as well get used to using it.
The !DOCTYPE tells the browser what language you’re using … boring … next.
All HTML sites need a bit of standard code to setup the page, in NotePad type:

Click File > Save.
Great, now we’ve finished with all the BORING stuff – Let’s move on to the fun stuff – I promised.

